Showing posts with label art. Show all posts

Thursday, January 8, 2015

[so cheap, so easy]: License Plate Art

Today I'm sharing one of my favorite DIYs. I've revamped it from its original form when it was covered in fabric instead of painted. This piece definitely gets a lot of attention--everything from, "I really love that," to "Why did you do that to your license plates?" (The latter is always from men, so those comments don't count!) This project is super easy AND super cheap. All you need is particle board (I had mine cut to 24x32); license plates, of course; furniture nails; spray paint; and paint for the particle board (I used urbane bronze by Sherwin Williams).  Simply spray paint your license plates, paint your particle board (or cover in fabric), and attach the license plates using furniture nails. That's it, you're done! 


Friday, February 7, 2014

[kreyv of the day]

image from Joe Schmelzer for The Animal Print Shop

Monday, January 27, 2014

Planking (Walls, Not People)

In case you thought I had turned into some extreme body planker over the weekend, I thought I had better clarify that I am talking about walls and not making my body completely straight while lying in random spots--not that there's anything wrong with that. I just haven't gotten around to it lately.  But, let's talk walls...

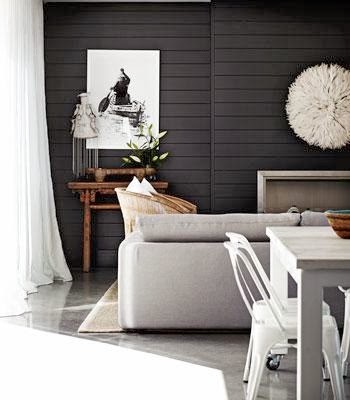
I love the way a planked wall gives interest and texture to a space, and I think the black planking is especially chic. It takes the cottagey (which is so not a word) vibe to a whole new level.  And I think I like taking things to a whole new level, don't you?
image from Judith Balis Interiors via Houzz
image from Room Zaar
image from Real Living

Wednesday, January 8, 2014

[color kreyv]: Pale Blue & Chartreuse

I'm not sure where or when this color combination came to me (not that I invented it, obvi), but if I had to guess, I'd say probably 3:00 a.m. when I was trying to sleep but instead thinking of pretty rooms. Isn't that when all your good ideas come to you (as your husband is just snoozing away, partly on your side of the imaginary bed line)? I have always loved pale blue, so I'm picturing the perfect shade of pale blue, bright whites, and accents of chartreuse…and not an obnoxious blinding chartreuse, but just a subtle chartreuse. Don't worry, I know exactly what I'm talking about, and the color swatches are being stored safely in my brain. 
image from Graciela Rutkowski Interiors via Decor Pad
image from Anne Packard
image from Southern Accents

Tuesday, January 7, 2014

[so cheap, so easy]: Jute Twine Art

For those of you who missed my guest post at UCreate, today is your lucky day, cause it's back, baby!  My jute twine art is cheap and easy aaand super chic! I hope you like it!
Here's what you'll need:
-  Frames (I used these frames from Ikea, but anything with a mat will work.)
-  Jute Twine
-  Tape (I used painter's tape, because it can be removed easily from the mat if needed, but any strong tape will work.)
-  Poster Board for Background
-  Paint for Background (I used Restoration Hardware's Silver Sage.)
-  Paintbrush

Now for the whopper of a tutorial: 
one) paint your poster board, and cut it to size; two) tape the twine to the back of the mat in the pattern of your choice; three) assemble your frame, and hang it up! Yup, that's it. When I said easy, I wasn't joking.


Tuesday, November 19, 2013

Eclectic Gallery Walls | How To

My bloggy friend, Leslie asked for tips on how to create an eclectic gallery wall without making it looking too busy.  An eclectic gallery wall is WAY easier to hang than a gallery that is perfectly aligned and symmetrical, but it can also seem more complicated to design.  There aren't really rules, besides just making it look pretty, but here are a few of my tips:

1 | My first tip when creating an eclectic gallery wall (meaning items/frames of different sizes, colors, and shapes), is to lay a mock plan on the floor. This will give you a general idea of where you will place items.

2 | Start with large items, and work your way out. Hang up the largest items first, and then fill in the blank spaces with smaller items. 
image from Decor Pad
3 | If you are too nervous to go too "freestyle", then use lines. You can arrange frames in a rectangle or square, or even align your frames on top, bottom, or both.
image from Beth Dotolo
image from Desire to Inspire
image from Skona Hem
4 | Use the same color of frames. Using the same color of frames will give a sense of unity and cohesiveness, although different colors of frames works well, too, depending on your preference.
image from West Elm
5 | Use a symmetrical layout. An eclectic gallery can still be symmetrical. The frames, artwork, and colors are the factors that will make it feel eclectic.
image from Pottery Barn
6| Just go for it! If you're not ready to just start hammering, use painter's tape and/or cut-outs to try out different layouts on your wall.  And, if all else fails, it's just a few holes in the wall. That's what spackle is for.  Just ask Mr. Hubs.

Tuesday, October 1, 2013

Framed Towels | My Dining Room Art

Before I start this post, let's just all try to ignore that awesome dining room light that I referred to yesterday as "rejected clearance," mmkay? Thanks. (BTW, if we owned our house, or even if we were sticking around for more than a year, I'd replace it with something simple like this.) 

Moving on... I am always trying to find an inexpensive way to create large scale art. Though I would love to purchase some great art, it's just ain't gonna happen any time soon, know what I'm sayin'? So, instead, I have to get creative, and lucky me, I have an awesome father-in-law that is willing to frame stuff for me. Like towels. That's right, towels. I bought two of these towels from H&M Home. The towels were attached to masonite using spray adhesive, then the frames were made to size. I stained and sanded the frames, popped the towels/masonite in, and nailed it all into place. (Ok, the only thing I did was stain and sand, but I found the towels and had the idea. Plus, I kept Jeremy company while he nailed everything together and hung them up. That counts for something, right?) The most important part is that I love them, and they only cost about $70 total, which is a great price for something this big. And awesome.

Linking up at

Monday, September 23, 2013

[in five + one]: Favorite ABC Products & Ideas

Hey there! I hope you all had a good weekend. Even though Mr. Hubs was mostly MIA with trips to the hospital, golfing, and football games, my mom, Stella and I had some girl time, and we got to spend Sunday with even more family, so that made up for it. The highlight of the weekend was Stella taking part in her first Primary Program at church. (The Primary is children's organization in my church.) Instead of singing the songs, she spent most of the time giving my niece, Sloane, the stink eye and folding her arms in full pouting position, because Sloane was eating Stella's snacks from her church bag. I must say, it was quite entertaining. Now onto our ABC's...

I love a great ABC product for a kid's space and even for a common living space--that's why I like them to be cute! ABC's are classic and timeless, and let's be honest, the idea of the gold letters is just plain chic. Here is a list of my top six (even though the series is supposed to be [in five]) favorite ABC ideas and products.  Links are included below each picture.
Gold ABCs from Uncovet (This image is of jewelry, but the idea on Pinterest is to buy letter magnets and spray paint them gold.)
Classic ABC Blocks from Uncle Goose
Stella's ABC Flashcard Art | Flash cards can be purchased from Amazon
Paul Thurlby's Alphabet Book
 Printable Polka Dot ABC Cards from Yellow Mums via Etsy
image from Orange You Lucky | Magnets can be purchased from Amazon

Tuesday, September 10, 2013

Love Hate Relationship | Chalkboard Paint

One DIY area I haven't ventured into is chalkboard paint. I love the way chalk looks, but I hate the way it feels. I love the writing all over the wall, but I never like the way my own writing looks. I love the the look of having chalkboards in a kids' space, but I would HATE the mess. You see my predicament, here? It's the red lipstick thing all over again: I love it on other people, but I just can't do it myself. What are your thoughts on chalkboard paint, love it or leave it?
image from Better Homes & Gardens
image from Scout for the Home via Decor Pad
image from House of Fifty

Tuesday, August 6, 2013

Black & White Gallery Walls

I am hoping that SOMETHING will go up on my walls this week. First stop: living room gallery wall. I am wanting to do something completely different than my last gallery. I'm thinking 9-12 large, black frames with black and white photos. I can't wait to get them up and give this pad a little bit of personality. Here are some inspiration pics. I'm in love, you?
image from Samantha Pynn
image from Gianetti Home via In Good Taste
image from Shelterness

Wednesday, May 22, 2013

[in five]: Favorite FREE Printables

Today is my first installment of my new series, [in five]. Let's be honest: [in five] is really just going to be an excuse for me to be even more random than I already am. But in list form. I might share five faves, five wishes, five things about myself, five reasons, five anythings I'm feeling like I need to share. I'm super excited about today's [in five], because it's five of my favorite free printables, and these are uuhhh-mazing. Print, frame, hang--they're fab. The links are under the pics, let me know which one is your fave!
image from Smitten on Paper
image from Mormon Mommy Blogs
image from Poppytalk
image from On to Baby
image from Gi Det Videre

Linking up at

Thursday, May 2, 2013

[so cheap, so easy]: Washi Tape Projects

I have GOT to get on the washi tape train. Seriously. Take a look at these projects. Dying over those tea lights. Die. Ing.  Have you played with washi tape? 
image from Trendenser
image from Design Stiles
image from Design*Sponge

Monday, April 29, 2013

How to Create a Vignette

When I design a room, I start with the big things: the rug, furniture, window coverings, lighting, etc. The last step is the styling. Styling is what pulls a room together and gives it personality. (Think of it as the jewelry, scarves, and killer stilettos of an outfit.)

Vignettes are a great way to style a room. Every room in your house probably has a vignette or two (or three), whether you know it or not. A vignette is just a display or arrangement. Whether or not design rules exist is debatable, BUT there are definitely certain arrangements, layouts, and designs, that are more visually pleasing. Here's one easy way to create a vignette:  think tall, medium, short, layer, layer, layer.  I actually don't think about "rules" when I design, but when I think of my own house or clients' homes, I find that I've subconsciously used this formula again and again, just because it looks right! Of course, there are several ways to create a vignette, but this way is a great place to start, and it always works!
image from Lilypad Cottage
image from Better Homes & Gardens
image source unknown 
image from Apartment Therapy
Linking up at

Monday, March 25, 2013

First Things First | Above the Couch

In one week, it will be April. That means that we will only have three months more in St. Louis before we move to Utah. Moving is such a pain, BUUUT it also means a new space to decorate. Of course, I've been thinking about important things like what I'm going to put over the couch in our next place. There's just one problem: We don't exactly have a wall over our couch. Or a place to live. I feel a mini freak out coming on.
image from Tobi Fairley
image from Lonny
image from Room & Board via Trad Home